
 The following is a step-by-step guide to producing a glass-topped button, where a glassy surface covers the underlying button and any image depicted thereon. The steps are geared towards ArtWorks2, the premier vector editing package for RISC OS, and there is a supporting file on my website showing the full eight steps in ArtWorks format. The basic steps should be generally applicable to other vector graphics packages on other platforms, so there is also PDF version of the file.
In each of these steps, the leftmost part of the image depicts the objects you are about to manipulate with a view of the button as it might be seen from the side, and the rightmost part is a view indicating your view of the objects on screen after the step has been carried out.
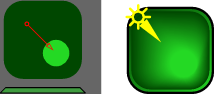
Step 1: Draw your basic button shape
To start your drawing, draw your shape with a background colour (somewhat darker than the desired colour) and give it a graduated fill from the darkest to the lightest colour you’ll be using. This will determine where the light is coming from – the darkest side is where the light will be coming from, and the lightest side is where it shines upon your button.

Step 2: Make a copy above the first
Copy the shape, making the new one smaller, giving the button the appearance of having a chamfer on its sides. Using the darkest colour of the previous shape give the new one a solid fill, and remove the line colour. (The second shape may not need to be the same as the first – it depends on the purpose of your final button.)

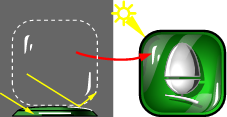
Step 3: Add a lens effect
The next step is to draw in the lens effect a rounded glass button has, when the light gets concentrated on one part of the background of the button. This is at the opposite side of the button to the light source, so it is the part of the shape you gave the lightest shade in step 1. Draw in a round shape, give it the lightest tint, and blend it with the background shape in about 50 steps – but if your button (or logo) is very large you may need to increase that number to avoid banding.
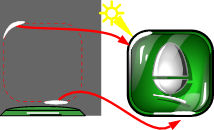
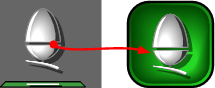
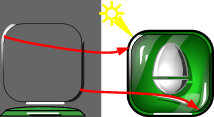
Step 4: Add your button content and a shadow
Copy the object you wish to display on the button into it, and give it a shadow so that it doesn’t look as though it is at the very back of the button. Don’t forget that the shadow should be consistent with the direction your light is coming from – so it should be pointing towards the lens effect drawn in step 3. The light angle will be more important when further light and reflection effects are added, making the button look more glass-like.
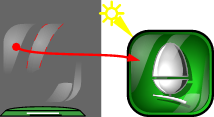
Step 5: Add soft reflections to the curved surface of the button
To give the button its rounded appearance, draw in reflections. It’s important to bend the sides of the vector shape to do this – the curve really determines the apparent shape of the top of the button: Make it straight, and the button will appear flat. The reflections are made out of parts of the original button shape, with a graduated fill from black to white, and the transparency set to 75% bleach.
Step 6: Add a hard reflection for a more lifelike appearance
To give the button a more lifelike appearance, you can draw in a hard reflection, made from the previous shapes. Give it a solid white fill, and make it much smaller in size. The light that has been reflected in steps 5 and 6 on the button surface can no longer shine on the background to leave a shadow, so reflections should always sit on top of the darkest parts of the button.
Step 7: Add side reflections to emphasise the chamfer
You may want to draw in side reflections, to bring in more attention to the chamfer (if you have one). Make a shape that fits the chamfer with a graduated fill from black to white. Be aware of where you have the light coming from. At the opposite side, close to the lightest side of the button, it’s the same – but this time use a solid black fill and 30% transparency. This will give the button extra depth.
Step 8: Final touches
Sometimes, reflections are so intense that they tend to take more visual room than their actual physical size. This is especially so with photography, where the CCD or traditional film can get over-exposed. Depending on the size and purpose of your button, you may wish to leave out steps 7 and 8. The smaller and/or more functional your button, the less detail is required.